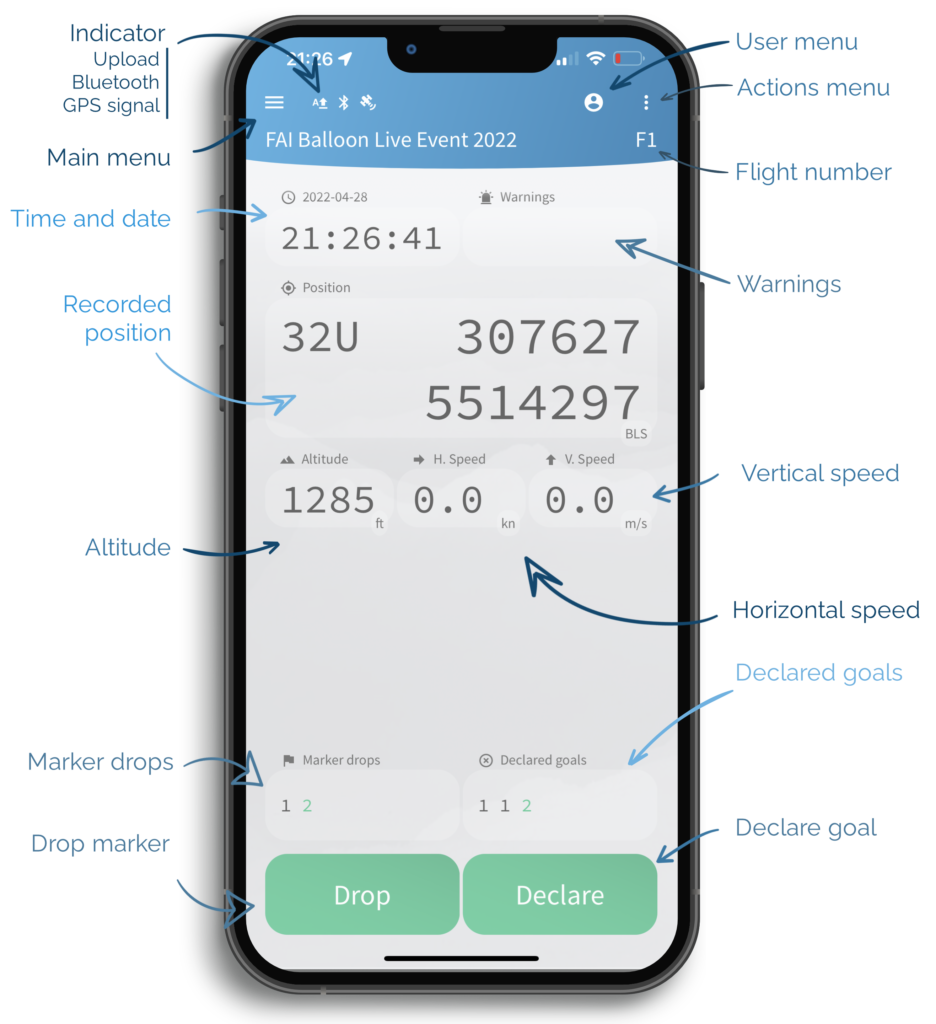
Balloon Live app
How to register to a competition
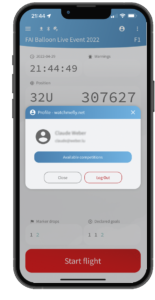
1 Login with your user profile
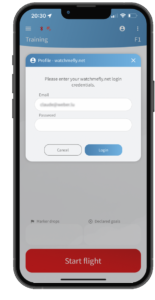
Tap on the user profile icon at the top right of the screen. This will open the login screen.
Login using your credentials from watchmefly.net.
2 Go the the list of available competitions
Go to the list of all competitions that are available to you.
3 Select the competition from the list
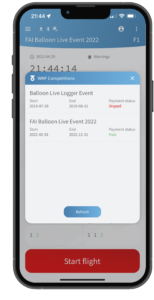
The list will be shown with all your available competitions.
If a specific competition is not shown, please contact the event organiser or officials team to verify they have registered you as pilot in the competition.
The list will also indicate whether a competition is free or a pilot fee must be paid. If you select an unpaid competition, you will be directed to the payment screen where you can purchase a payment credit through the in-app purchase system of the app store.
A competition you have already paid for, on this or any other device, will be marked "paid" and can be selected without any further payment.
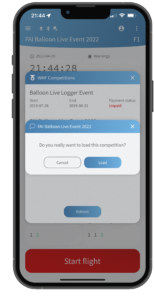
Tap Load to enter the selected competition. At this moment, the app will also get all relevant competition settings.
How to record a competition flight
1 Select the competition
Go to the list of your available competitions in the user menu and select the competition you want to load (see above).
2 Synchronise active flight data

This synchronisation should be done during the task briefing or when instructed by the director. An internet connection is required.
Open the actions menu at the top right of the screen.
Select Update flight to get the latest flight data.
Note: The flight data will be valid for 5 hours maximum to start a flight. After this time, or if you have not updated the flight data before, you will be requested to do so when starting the flight.
The indicator Fn below the actions menu button indicates the flight number that has been loaded.
3 Start flight
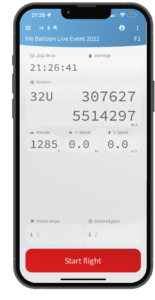
To start the flight, push the red button "Start flight" at the bottom of the screen.
Note: If you start your flight while being offline, the flight data must not be older than 5 hours.
4 Recording during flight
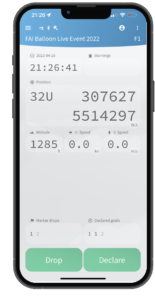 All track, marker drop and declaration data is recorded during the flight in the app.
If internet connectivity is available, the app will continuously upload the data to the server of watchmefly.net. The upload-icon at the top left indicates with a leading A (Automatic) that track points are being uploaded to the server.
- If the icon is white, less than 20 track points are still to be uploaded.
- If the icon is yellow, between 20 and 120 track points are still to be uploaded.
- If the icon is red, more than 120 track points are still to be uploaded.
If no internet connectivity is available (or lost during flight), the app will continue to record and buffer all data on the device and resume upload as soon as connectivity is available.
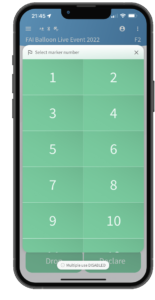
5 Drop marker
To drop a marker during a flight, simply hit the Drop marker button on the main screen.
Select the marker number you wish to drop.
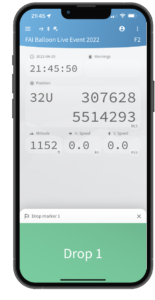
Wait until the moment you wish to release the marker and hit Drop.
6 Make a declaration

To make a declaration during a flight, simply hit the Declare button on the main screen.
Select the goal number you wish to declare.
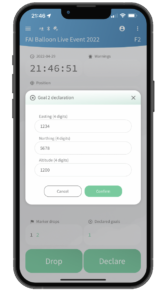
Enter the coordinates and altitude if needed and Confirm the data entry.
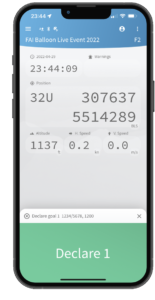
Hit the Declare button to finalise your goal declaration (or the cancel button at the right just above).
7 Stop flight
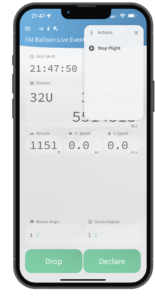
To stop the flight, open the actions menu at the top right
Tap "Stop flight".
NOTE: After stopping a flight, please make sure that all track points have been transmitted to watchmefly.net.
You can verify if all track data has been transmitted to watchmefly.net by checking the upload icon at the top left of the screen.
- If the icon is white, less than 30 track points are still to be uploaded.
- If the icon is yellow, between 30 and 100 track points are still to be uploaded.
- If the icon is red, more than 100 track points are still to be uploaded.
Once the upload is completed, the leading A next to the icon will disappear.
If you have no internet connection, all remaining unsent track data will be transmitted to watchmefly.net as soon as internet connectivity is re-established. This can be minutes or hours after you stopped the flight. If internet connectivity is available, just start up the app and the upload will resume.
The track file with all marker drop and declaration data is also stored in the app and can be shared by selecting Share flights in the left menu.
Watchmefly.net
How to connect the app to Watchmefly.net
1 Log in with your user profile
Tap on the user profile icon at the top right of the screen. This will open the login screen.
Login using your credentials from watchmefly.net.
If you don't have an account yet, please register on watchmefly.net. During account setup, you will normally be asked to link your account to the name already known by watchmefly.
Note: Watchmefly has stored many results of previous competitions or the competition officials may have entered your name in the pilot list.
2 Go to the list of your available competitions
Go to the list of all competitions that are available to you.
How to download you competition track data
1 Log in to watchmefly.net
Go to watchmefly.net and log in using your credentials.
If you don't have an account yet, please register. During account setup, you will normally be asked to link your account to the name already known by watchmefly.
Note: Watchmefly has stored many results of previous competitions or the competition officials may have entered your name in the pilot list.
2 Navigate to your profile page
Select your My profile page under the account menu at the top right.
3 Download tracks of your competition
Switch to Your competition data section at the top.

You will then find a list of all your competitions with:
- the name of the event and your registration token in the header
- the list of all recorded flights and the possibility for each flight to download the IGC/OZI file or display it on a Google map.
Balloon Live Sensor (BLS)
General questions
Can the sensor be used as external GPS for other apps (mobile or laptop)?
Yes. It has bluetooth connectivity (BLE) to the Balloon Live app (phone or tablet) and a separate bluetooth connectivity (Bluetooth SPP profile with NMEA) to up to 2 devices (laptop) to be used for mapping applications. All these connections can be used at the same time.
Will FAI Ballooning Commission create a pool of devices event organisers can rent?
No. Unlike with the previous FAI Balloon loggers, FAI Ballooning Commission will not create a pool of devices that can be rented by event organisers. In upcoming events using Balloon Live, the pilot will be required to bring his own Balloon Live Sensor to make sure the quality of the position recorded for scoring is the same for all pilots.
What events will use Balloon Live in the future?
The event organisers usually decide what logger system they want to use. The past years have shown that many event organisers are interested in using the Balloon Live app with the Balloon Live sensor in the future as this has replaced the FAI Logger used until 2021. Among these are organisers of regional and national championships as well as larger events.
Where can I buy the Balloon Live Sensor?
Initial order were made through special purchase events held in 2020 in 2021. Over 750 devices were ordered by pilots from around the world.
If you missed the sale event or you wish to purchase a device sooner, please contact your Flytec Balloon dealer for an individual purchase.
Where is the recorded track stored?
The recorded track is stored in up to 3 locations:
- The Balloon Live app stores a recorded track and it can be shared as IGC file through the normal sharing possibilities on the device.
- The Balloon Live Sensor additionally stores the track in IGC format on its SD card.
- If you use Watchmefly.net for the competition, the track is also transferred to watchmefly.net once the phone/tablet is online.
What's in the box with the Balloon Live Sensor?
Technical details
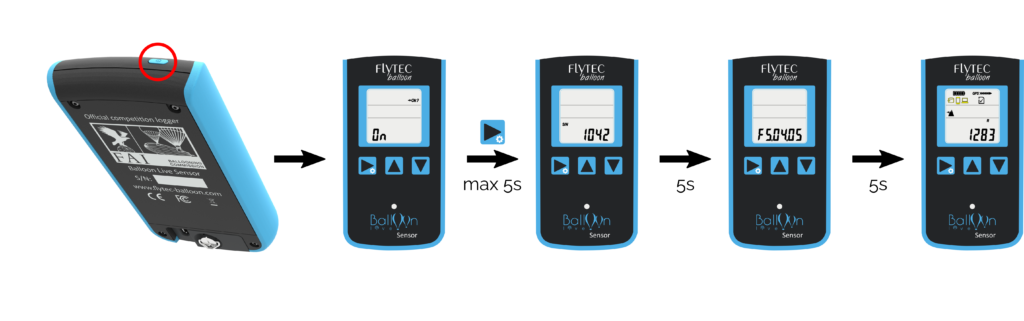
How can I switch the BLS on?
To turn the BLS on, simply press the On/Off button on the top edge of the device. First the screen will ask for confirmation to turn the device on. You have to confirm this within 5 seconds with the OK/mode/config button on the left. After confirmation the device serial number and the currently installed firmware (software) version will be shown.
How do I charge the BLS?
How long does the BLS run with one battery charge?
How do I turn off the BLS?
What connection options does the BLS have?
The BLS uses a micro USB socket for charging the internal battery and for mass storage operations to access files on the SD card.
In addition to physical connecting the device via the micro USB cable the BLS offers multiple parallel Bluetooth connections. The Bluetooth Low Energy (BLE) connection is used to connect with the Balloon Live app on your mobile device. Up to three additional devices can be paired through Bluetooth Serial connections to receive the GPS information.
These Bluetooth Serial connections require a device capable of the Bluetooth V4.0 specs. Devices with older Bluetooth specifications will not be able to connect to the BLS.
Can I change the battery of my BLS?
IMPORTANT: If the device is opened by unauthorized personnel it will render the BLS unusable because it will erase the device specific encryption key which is used to authenticate the data provided by the device. Once the device has been opened, it has to be sent in to the next service station for repair.
How do I pair the BLS with the Balloon Live app?
The connection to the BLS is done entirely from within the Balloon Live app. You only need to turn the BLS device on so that it can be found. Do not use the bluetooth settings on your device.
The connection of the Balloon Live app and the BLS is done in two major steps:
- Select the type of GPS device to be used by the app
- Select the desired BLS device from a list of nearby devices
These steps are described in detail in the next sections.
How do I select the GPS device type to be used by the Balloon Live App?
In the main screen of the Balloon Live app select the three bar menu on the top left of the screen.
This will show the main menu where you need to go into Positioning devices. At the top of the screen you will see the currently selected primary positioning device. This may be set to Internal if the device configuration is done for the first time. Tap on the displayed primary positioning device which will open a selection menu with the following options:
Internal / Balloon Live Sensor. No other devices are supported at the moment.
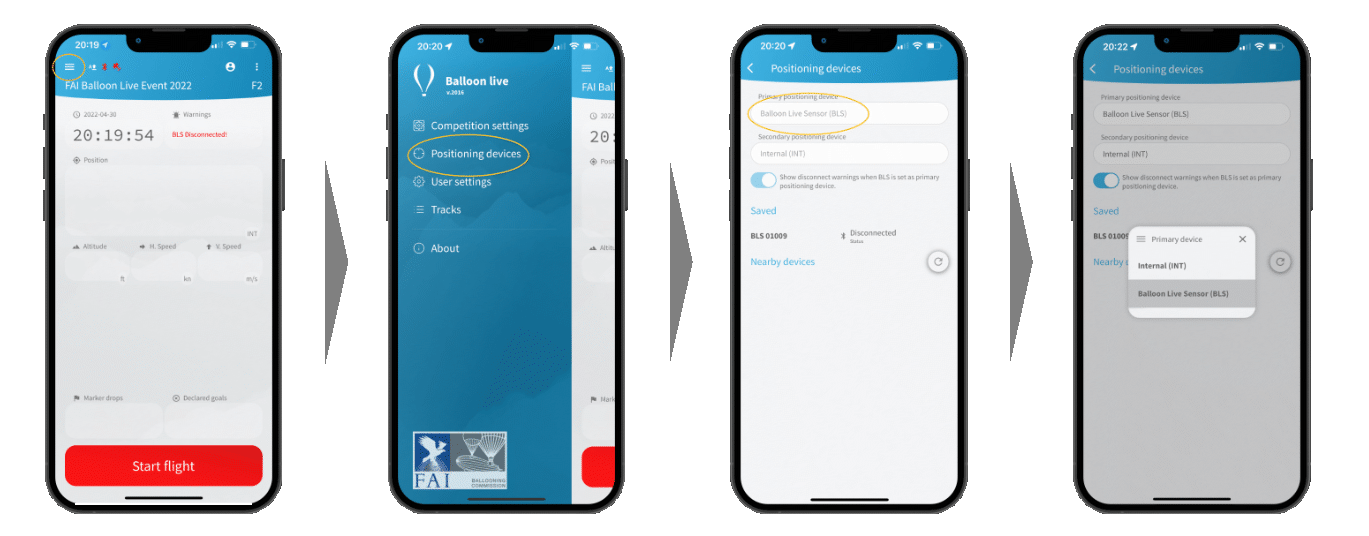
You should also select a secondary positioning device, especially if you use Balloon Live Sensor (BLS) as the primary one. In case the primary device is disconnected during flight, the app will try to connect to the secondary device to continue receiving a position. This will ensure a continued track recording if the primary device (usually BLS) connection should fail. The track recording will contain information which sections of the track were recorded from the Balloon Live sensor (BLS) and which sections were recorded from the internal GPS of the mobile device.
How do I select a specific BLS to connect to?
In the Positioning devices screen tap on the Refresh button to see all nearby Balloon Live sensors (BLS). Make sure the sensor is switched on.
The devices can be identified by their serial number. Compare the serial numbers to the serial number which is printed on the back side of the device and marked with S/N. The search screen will list all nearby devices with their full device names, which are made up of the text “BLS” and the 5 digit serial number.
When you have located your BLS device, tap on it. A popup screen will ask for a confirmation to connect the selected sensor.

The last connected Balloon Live sensor will always be listed under Saved. It will connect as soon as you switch the sensor on.
Do I have to pair the BLS every time I turn it on?
No, the Balloon Live app will remember the BLS device that it was connected to last time. When the app is used again, it will attempt to connect to the same device that was used previously. Simply turn on the BLS and the Balloon Live app will connect to it automatically.
Can I pair a different BLS with the Balloon Live app?
Yes, the Balloon Live app can connect to any other BLS, e.g. if the previous BLS is not available. Simply follow the pairing instructions above to select a different GPS device from the GPS configuration screen.
How do I pair the BLS with my PC using Bluetooth?
In addition to the connection with the Balloon Live App it is possible to pair the BLS with up to 3 Bluetooth devices at the same time to transmit the GPS data via a serial connection. A BLS device is ready for pairing for approximately 10 minutes after it was turned on. On your computer you simply start the search for a new Bluetooth device. You need to look for the device called “Balloon Live Sensor xxxxx” where xxxxx stands for the 5 digit serial number of the BLS. Do not pair with the “BLS xxxxx” device since that is the channel which is used by the Balloon Live app and uses a private protocol.
For Windows 10 the pairing process needs to follow the following steps:
- Open the Windows Settings control panel and click on Devices.
- After opening Devices, Bluetooth & other devices should be preselected. Make sure that Bluetooth is activated.
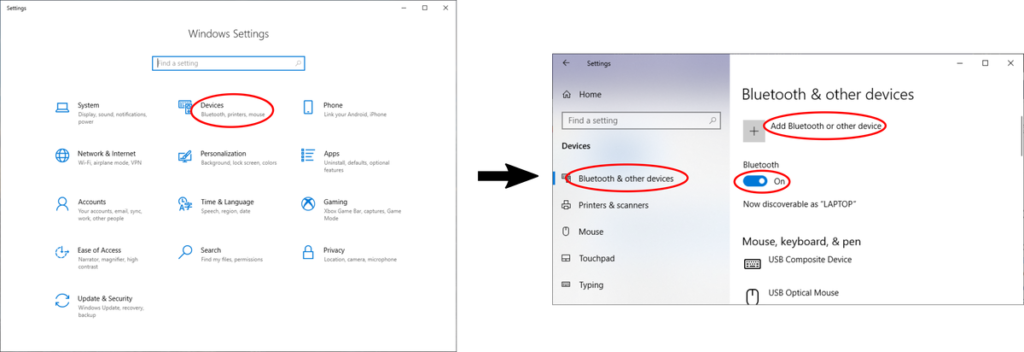
- Click on Add Bluetooth or other device, and on the following dialog select Bluetooth.
- The next panel will show nearby Bluetooth devices. As mentioned above, select the “Balloon Live Sensor xxxxx” device which matches the serial number of your BLS.
- After clicking on the desired “Balloon Live Sensor”, Windows will start connecting to the BLS. The connection does not require a PIN code but will connect the device with the computer without any further interaction.
- Next you need to identify the COM port that is assigned to the newly added Bluetooth device. This can be quickly found from the Bluetooth & other devices dialog. Scroll down to find the option More Bluetooth options. This will open the Bluetooth Settings dialog where you need to switch to the COM ports tab. In that tab you should see the “Balloon Live Sensor” connection that was just added. We need to remember the serial port associated with the “Balloon Live Sensor xxxxx ‘Serial Port’”, in that example it would be COM5.

This COM port can then be used for your navigation software that reads GPS NMEA sentences. The port supports connection speeds up to 115,200 bit/s.
For other operating systems the pairing process should follow similar steps.
I have been asked to upgrade the firmware on my BLS, how can I do this?
 If you have to upgrade the firmware of the BLS, you will have received a file called “sensbox.upg”. This file has to be copied to the SD card into the “system” folder and the filename needs to be exactly “sensbox.upg”. If there is a firmware file from a previous upgrade, you need to erase it before copying the new file.
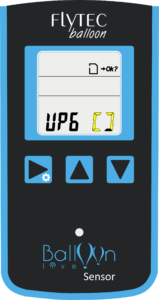
Once the new firmware file has been copied to the SD card and the SD card is inserted into the BLS, the BLS first needs to be turned off. Disconnect the BLS from the computer. Now first press and hold the OK/mode/config button and then turn the BLS on using the On/Off button. This will start the BLS in upgrade mode and if a new firmware is found on the SD card, the upgrade will be performed. Progress of the upgrade will be indicated by a moving segment in the value display while the left side contains the word “UPG”. When the upgrade has completed, the BLS turns itself off automatically. The new firmware will be active when the BLS is turned on the next time.
How do I modify the volume of the audible variometer?
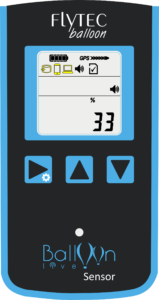
The BLS device supports an audible variometer with 4 different volume settings (100%, 66%, 33%, and off). Unless the volume is turned off a variable sound will indicate ascend or fast descend rates.
To adjust the volume use the OK/mode/config button to navigate to the Audio menu. Within the Audio menu you can use the Selection Up and Selection Down buttons to increase or decrease the volume. The setting will be accepted immediately, it does not have to be confirmed.
What are the specifications of the battery?
The BLS has a single cell lithium battery which has a nominal voltage of 3,7V and 2500mAh. This equals to 9,25Wh.
Facing problems?
I can’t turn my BLS on, what can I do now?
What can I do if the BLS is frozen and I can no longer turn it off?
In rare cases it was reported that the BLS was freezing while doing a firmware upgrade. In that case the movement of the segments in the display stopped and the BLS no longer reacted to any buttons being pressed.
To get out of this situation, remove the SD card cover on the back and remove the SD card. Then press the two right buttons (up and down) and the on/off button all three at the same time for a few seconds. This will reset the device.
After the BLS has been reset, insert the SD card again and restart the the device, either in upgrade mode or regular restart.
Please DO NOT attempt to open the device to remove the battery. This will erase the secure encryption key from your device and you need to contact support to be able to use the device in competitions again.
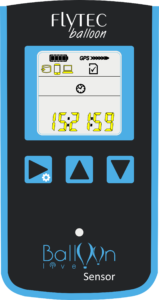
My BLS shows an incorrect time, how do I change it?
Use the OK/mode/config button to activate the Clock mode. Now press and hold the OK/mode/config button for 3 seconds to enter the clock set mode. In the clock set mode the time will begin to flash and you can change the time zone back and forth using the Selection Up and Selection Down buttons. The BLS will cycle through all available time zones, including those that are not on full hours. When the clock shows the correct local time you can confirm the time zone by pressing the OK/mode/config button.
The time on the BLS is changed when connected to the Balloon Live app
With firmware version 4.14 and later the Balloon Live app will synchronize its settings with the BLS. That also affects the time displayed on the BLS and in the app.
The time zone that is used is controlled by the flight settings in the Balloon Live app. In training mode you can change the time zone in the app by selecting the three bar menu in the top left of the app and then going into "Configuration". The third entry line contains the time offset to UTC in seconds. Use positive numbers for time zones east of UTC, negative values for time zones west of UTC.
Sample values:
- Central European time: 3600 (UTC+1h) or 7200 (UTC+2h) with daylight savings time
- Eastern time (e.g. New York City): -18000 (UTC-5h) or -14400 (UTC-4h) with daylight savings time
- Japan standard time: 32400 (UTC+9h)
When the Balloon Live app is in competition mode and registered with an event, the time zone will be the one configured for the event in watchmefly.net.
I want to turn off the BLS but get a message “Sd Err”, what does it mean?
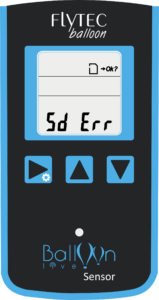
My BLS shows message
The BLS uses a secret encryption key to sign the IGC file recorded on the internal SD card of the device. To prevent any possible fraud, this secret encryption key will be erased automatically when the case is attempted to be opened.
Once the encryption key has been erased, the BLS can no longer record tracks to the internal SD card and some function with the Balloon Live app will no longer be available. Every time the BLS is turned on, it will display the error message "E SEAL" which needs to be confirmed with the OK/mode/config button.
Contact support by e-mail if this message is shown to discuss further steps.
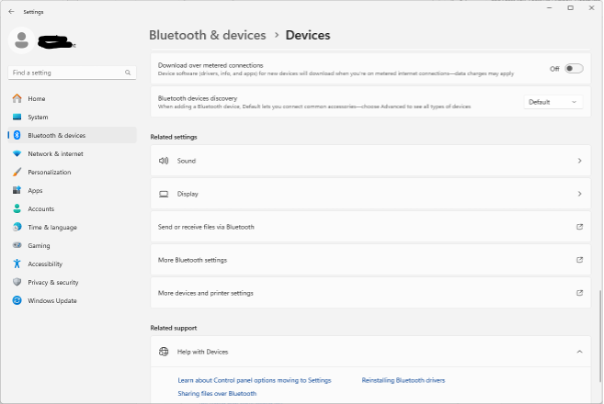
I can not pair the BLS with my PC using Bluetooth on an updated Windows 11
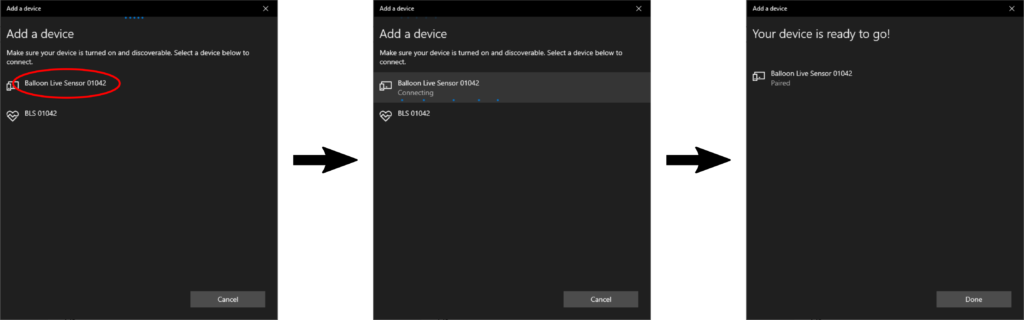
Windows 11 has modified the Bluetooth device listing and the Balloon Live sensor must now be paired via the “old” Device pairing dialog.
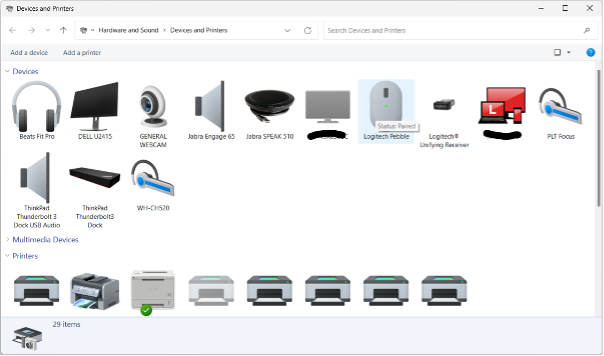
In the “Bluetooth & Devices” section, scroll down and select “More devices and printer settings”:
In the new “Devices and Printers” dialog, select “Add a device”
Make sure that the BLS has been switched on less then 10min. The search will list all Bluetooth devices. Make sure you select the “Balloon Live Sensor xxxxx” device where xxxxx is your device’s serial number.
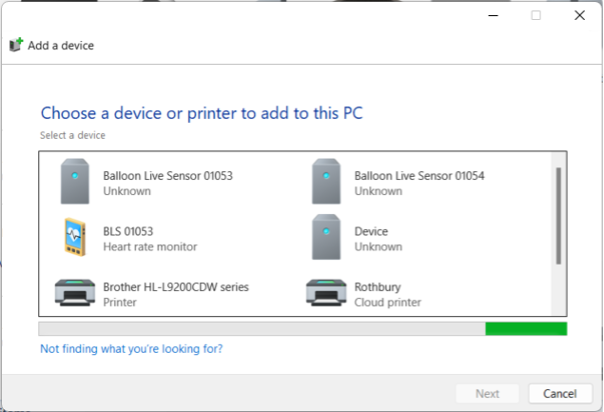
To determine the COM port see “How do I pair the BLS with my PC using Bluetooth (Win10 and old Win11)” in the FAQ.
Other problem?
If you couldn't find an answer to your problem, please contact the Balloon Live support team.